Home > Manage CAP Gateways > Install a CAP Gateway > Manual Installation for Windows Gateway
Download this articleManual Installation for Windows Gateway
Before installation, note the following:
-
For Azure VM and Azure Storage, the gateway must be installed on a VM within the same tenant as the protected VMs/blob containers/file shares configured in the backup scope.
-
It’s recommended to install the gateway in the same zone/region as the protected instances configured in the backup scope for optimal performance.
-
It is recommended that the instance where the gateway is installed runs Windows Server 2019 Datacenter-x64 Gen1 as its operating system, with a configuration of 4 CPU cores and 16 GB of memory.
-
For better performance, you can use different gateways for different backup scopes and use multiple gateways for one backup scope as needed.
-
For Azure VMware, the VDDK file is required to activate the gateway. For details, refer to Download and Install VDDK
-
For Azure PostgreSQL, the PostgreSQL client is required to enable PGDUMP to activate the gateway. For details , refer to Install PostgreSQL Client.
Follow the steps below to install the CAP Gateway:
-
Select a gateway and click Get package.
-
In the Get package panel, follow the steps below:
-
In the Install PostgreSQL client step, download and install the PostgreSQL client to enable PGDUMP to activate the gateway. For details , refer to Install PostgreSQL Client. Skip this step if the client is already installed.
NOTEThis step is required only for Azure PostgreSQL. If you are installing a gateway for other services, skip this step.
-
In the Get package step, copy the SAS URL for package to your clipboard.
-
Locate the Azure VM/Azure Storage VM/Azure SQL database/Azure VMware Solution/Amazon EC2 instance/Amazon S3 bucket/SQL Server database/PostgreSQL server/Cosmos DB/Google VM instance/Google Cloud Storage buckets where the gateway will be installed, then execute the following command using Windows PowerShell to download the installation package to your instance/VM/database/bucket. Replace ‘CAPGateway.zip’ in the command with the actual downloaded package name and replace ‘sas url’ with the SAS URL copied in the Get package step.
NOTEThe ‘O’ in the command is the uppercase letter 'O', not the number zero '0'.
-
In the SAS URL for configuration file/Signed URL for configuration file step, copy the passphrase and URL for the configuration file to your clipboard.
-
To protect Microsoft Azure service, Amazon service, self-managed SQL Server, Azure PostgreSQL, or Cosmos DB, copy the SAS URL and passphrase to your clipboard.

-
To protect Google Cloud service, copy the Signed URL and passphrase to your clipboard.

-
-
-
After downloading, execute the following command line to extract the package contents to the ./capwin directory.
NOTE- Before running the command, ensure the ./capwin directory exists. You can verify its existence with the following command:
mkdir -p./capwin. - If the ./capwin directory does not exist, you can execute the following command line to create one:
New-Item -ItemType Directory -Path ".\capwin" -Force.
- Before running the command, ensure the ./capwin directory exists. You can verify its existence with the following command:
-
Execute the following command line to run the install.sh script. Replace ‘passphrase’ and ‘url for configuration file’ in the command with actual values copied from the Get package panel.
-
To protect Microsoft Azure service, Amazon service, self-managed SQL Server, Azure PostgreSQL, or Cosmos DB, replace ‘url for configuration file’ with the SAS URL for configuration file copied from the Get package panel > SAS URL for configuration file step.
-
To protect Google Cloud service, replace ‘url for configuration file’ with the Signed URL for configuration file copied from the Get package panel > Signed URL for configuration file step.
-
Update a CAP Gateway
If you need to update your CAP Gateway configurations, such as the passphrase and url for configuration file, follow the steps below:
-
Execute the following command line to download a new package.
-
Execute the following command line to unzip the downloaded package.
-
Expand-Archive -Path "CAPGateway.zip" -DestinationPath ".\capwin" -Force
-
Execute the following command line to install the new package. Replace ‘passphrase’ and ‘url for configuration file’ in the command with actual values copied from the Get package panel.
-
To protect Microsoft Azure service, Amazon service, or self-managed SQL Server, Azure PostgreSQL, or Cosmos DB, replace ‘url for configuration file’ with the SAS URL for configuration file copied from the Get package panel.

-
To protect Google Cloud service, replace ‘url for configuration file’ with the Signed URL for configuration file copied from the Get package panel.

-
Verify Checksum
After downloading the installation package, you can run the following command to verify its checksum. Compare the result with the hash value displayed in the Get package panel to ensure the checksum is correct. Replace ‘CAPGateway_SerialNumber.zip’ in the command with the actual downloaded package name
Uninstall a CAP Gateway
If you want to uninstall the CAP Gateway, locate the unzipped package folder, and execute the following command line:
Download and Install VDDK
To enable the gateway for Azure VMware, ensure that a VDDK file is installed. Follow the steps below to download and install the VDDK file.
-
Access the VDDK download page and log in with your account. If you do not already have an account, simply register using a valid email address to create one.
-
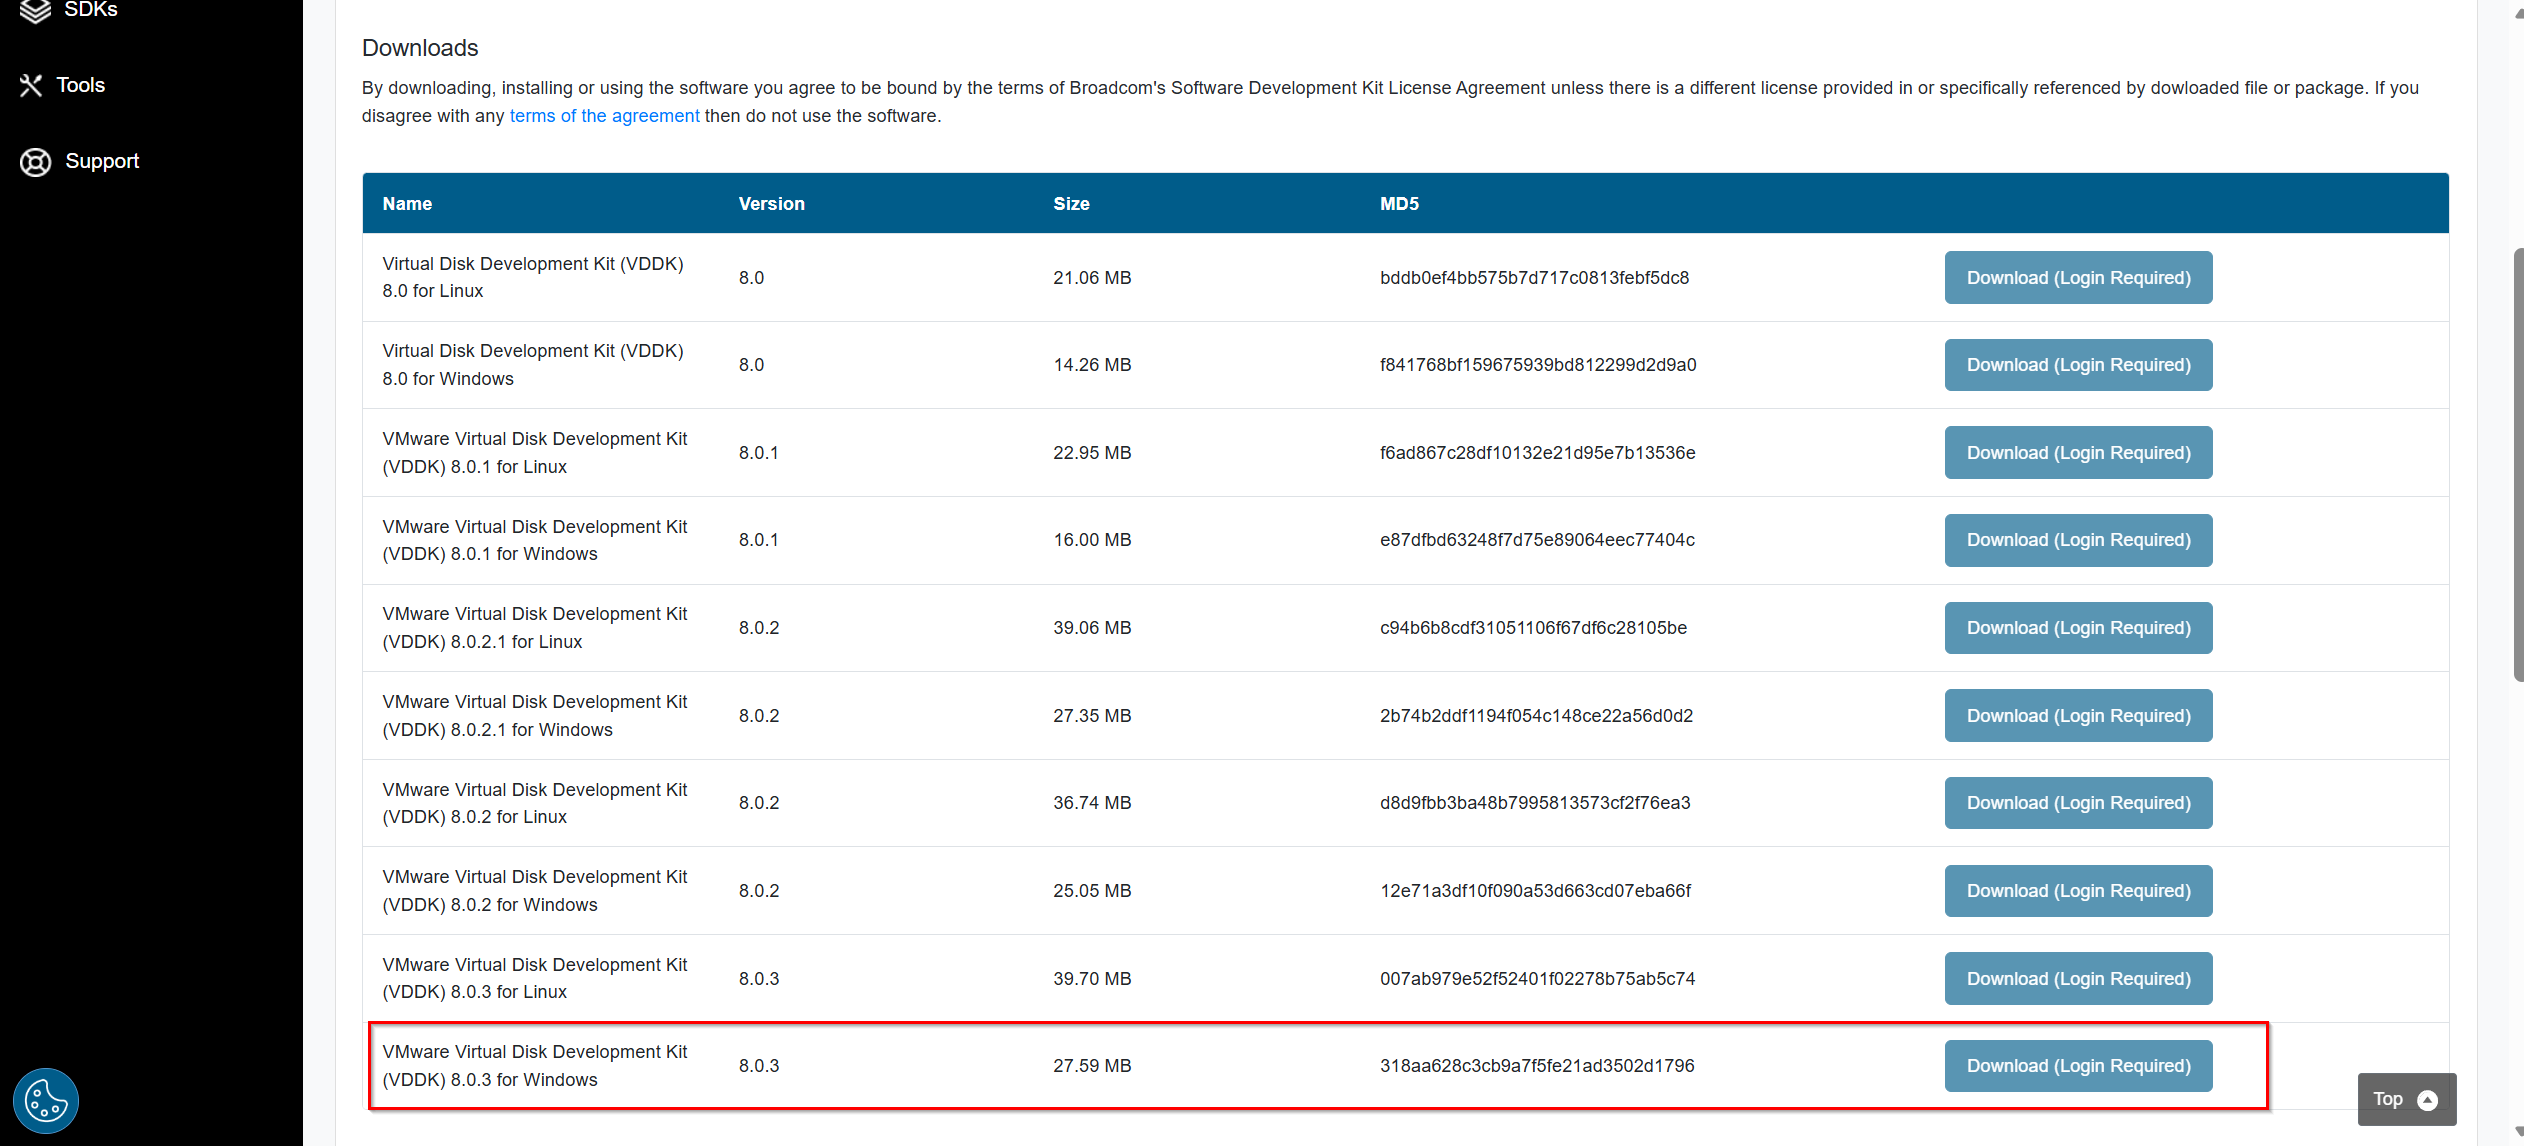
Find the VMware Virtual Disk Development Kit (VDDK) 8.0.3 for Windows tar.gz file and click Download.
NOTEThe file version may be updated. Please download the latest version.
-
Upload the VDDK file to the CAP Gateway VM and extract its contents to the C:\Program Files\VMware-vix-disklib directory.
Install PostgreSQL Client
To enable the gateway for Azure PostgreSQL, ensure that the PostgreSQL client is installed. Follow the steps below to download and install the PostgreSQL client.
Before downloading and installing the PostgreSQL client, ensure that the C++ Redistributable is installed on your Windows system. If it is not installed, go to the C++ Redistributable download page and install the latest supported version for your Windows architecture.
-
Access the PostgreSQL download page.
-
Download the latest PostgreSQL version.
-
Follow the instructions in Installing PostgreSQL on Windows to complete installation. Note that in the Select Components step, only the Command Line Tools option is required.
