Home > Restore and Recover Your Data > Use the Compare Method > Microsoft Entra ID
Download this articleMicrosoft Entra ID
Before restoration, you can choose to compare all items or specific objects.
Compare All Data
To compare all data, follow the steps below:
-
In the Restore page, click Microsoft Entra ID, and then click the Compare tile. All the existing comparison reports are displayed in the Compare page.

-
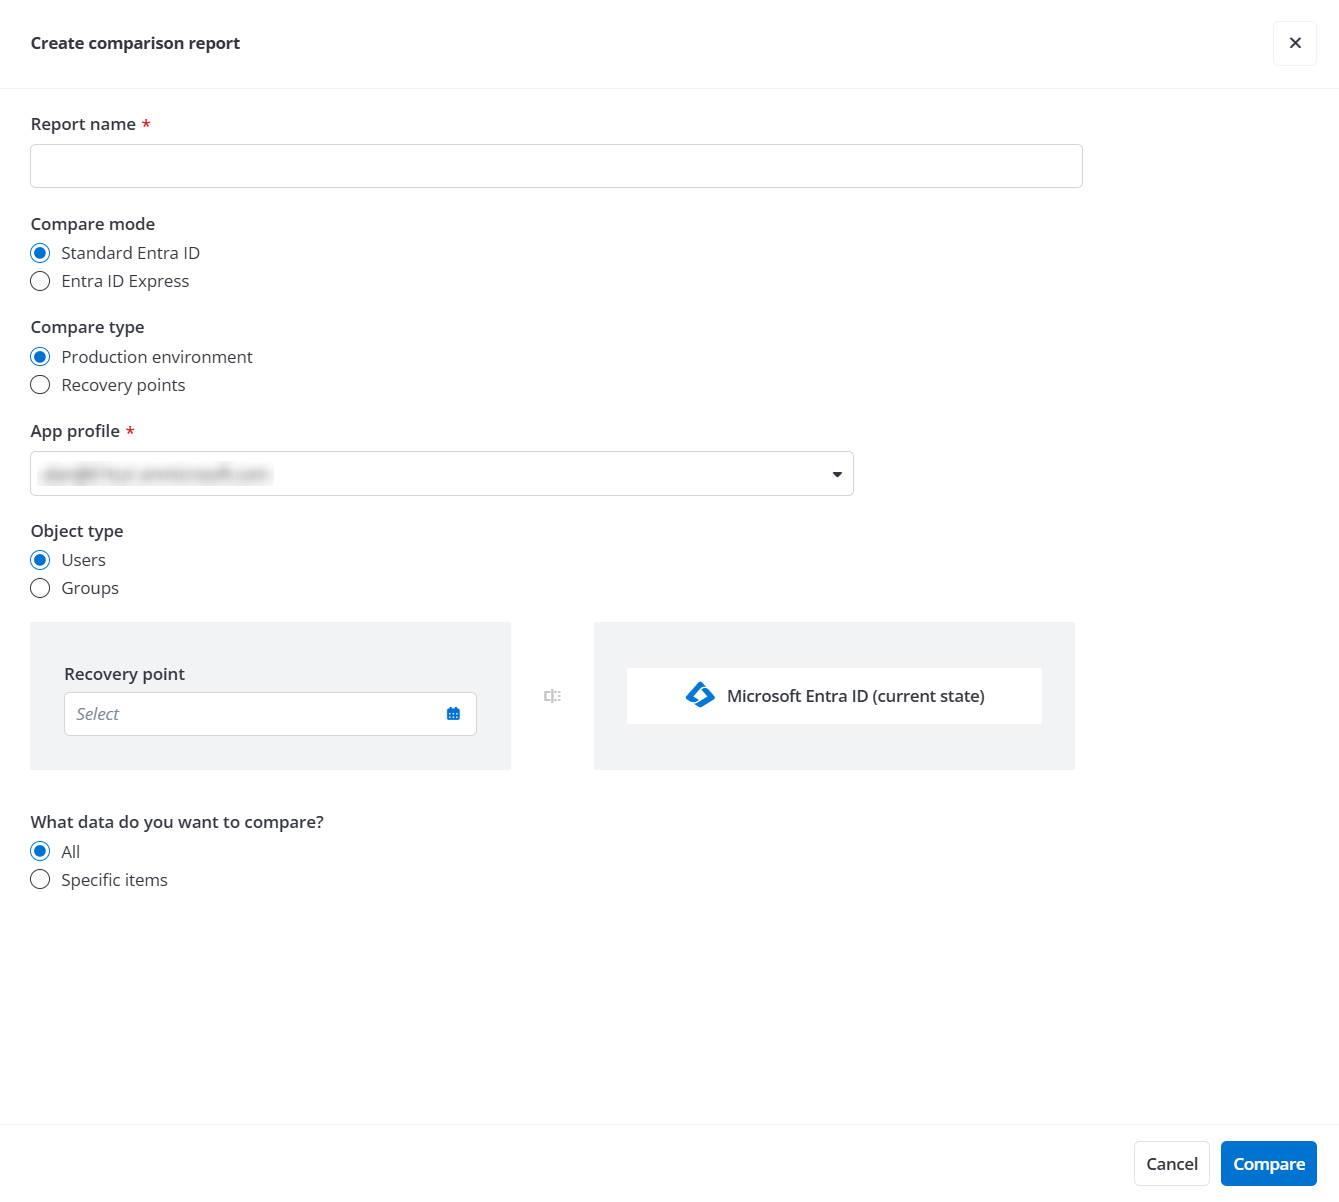
Click the Create button to create a comparison report. Complete the settings below:
-
Report name - Enter a report name for the comparison report that you are about to create.
-
Compare mode - Choose to compare data using Standard Entra ID mode or Entra ID Express mode.
-
Compare type - Choose to compare two recovery points or compare the selected recovery point with the current state of Microsoft Entra ID.
NOTEThe field is required only when selecting Standard Entra ID as the compare mode.
-
App profile - Select the app profile from the list.
-
Object type - Currently, the Compare feature only supports comparing the backup data for users or groups in the Microsoft Entra tenant.
-
Recovery points - Select the recovery point from the calendar according to the compare type that you have configured.
-
What data do you want to compare - Select All to compare all data.
-
-
Click Compare. The comparison job will start, and you can view the job progress in the Compare page.
-
After the comparison job is finished, click the report name to open the comparison report.
-
In the View comparison report page, you can get the basic information of this comparison report, including the tenant name and the recovery points selected to compare. If only one recovery point is displayed, this comparison report was generated for comparing the backup data against the current state of the Microsoft Entra environment. In the Summary section, you can also get a summary of the report for the total number in the scope and the number of users or groups being added, modified, not found, or unchanged.
-
You can use the Name, Object ID, or User principal name to search for the data or use the Filters (such as, Company, Office location, Department, or Status) to find the data. Note that if the properties that have been updated for the user or group are currently not supported by Cloud Backup for IaaS + PaaS, the user or group will be tagged as Modified in the report, though the report cannot show the differences. To view the differences, click the object ID on the row.
-
You can select the data that you want to restore and click Restore. Users or groups can be restored to the original location or a new location. For details, refer to Restore Users or Restore Groups.
Compare Specific Items
To compare specific items, follow the steps below:
-
In the Restore page, click Microsoft Entra ID, and then click the Compare tile. All the existing comparison reports are displayed in the Compare page.

-
Click the Create button to create a comparison report. Complete the settings below:

-
Report name - Enter a report name for the comparison report that you are about to create.
-
Compare type - Choose to compare two recovery points or compare the selected recovery point with the current state of Microsoft Entra ID.
-
App profile - Select the app profile from the list.
-
Object type - Currently, the Compare feature only supports comparing the backup data for users or groups in the Microsoft Entra tenant.
-
Recovery points - Select the recovery point from the calendar according to the compare type that you have configured.
-
What data do you want to compare - Select Specific items to compare specific users or groups.
-
-
Click Next.
-
In the Select objects step, select the users or groups you want to compare. You can select at most 100 users or groups to compare.
-
Click Compare. The comparison job will start, and you can view the job progress in the Compare page.
-
After the comparison job is finished, click the report name to open the comparison report.
-
In the View comparison report page, you can get the basic information of this comparison report, including the tenant name and the recovery points selected to compare. If only one recovery point is displayed, this comparison report was generated for comparing the backup data against the current state of the Microsoft Entra environment. On the Summary section, you can also get a summary of the report for the total number in the scope and the number of users or groups being added, modified, not found, or unchanged.
-
You can use the Name, Object ID, or User principal name to search for the data or use the Filters (such as, Company, Office location, Department, or Status) to find the data. Note that if the properties that have been updated for the user or group are currently not supported by Cloud Backup for IaaS + PaaS, the user or group will be tagged as Modified in the report, though the report cannot show the differences. To view the differences, click the object ID on the row.
-
You can select the data that you want to restore and click Restore. Users or groups can be restored to the original location or a new location. For details, refer to Restore Users or Restore Groups.