Home > Reports > View and Export License Reports > View License Report by Users
Download this articleView License Report by Users
If you want to view the user detailed information of the selected tenants and user container groups, you can click the Users tab where you can view the detailed user list in your tenants along with their basic properties, assigned licenses, and detailed activity information.
In the user listing table, you can:
-
Manage table columns - Click Manage columns to the upper right corner of the user table to select desired columns to display.
-
Filter data – Click Filters to the upper-right corner of the user table. Then filter users by User status, Microsoft 365 subscription, MFA status, and Last sign-in time.
NOTECharts in the AI license overview section displays data in the last 30 days and it cannot be changed by the date range filter.
-
Manage table views - Click the select view button to access options:
-
Save – Save changes to the current view, including selected columns and filters.
-
Save as a public view – Create a new view accessible to everyone.
-
Set as my default view – Make the current view your default.
-
Delete – Remove the current view.
-
-
Search for certain users – In the searching box, enter the username to search for a user.
For more detailed instructions on available operations in the Users tab, refer to the following sections.
Basic Overview Charts
At the top of the Users tab, the Basic overview section provides a high-level of license usage and costs with the following charts.
Users & License Costs Breakdown
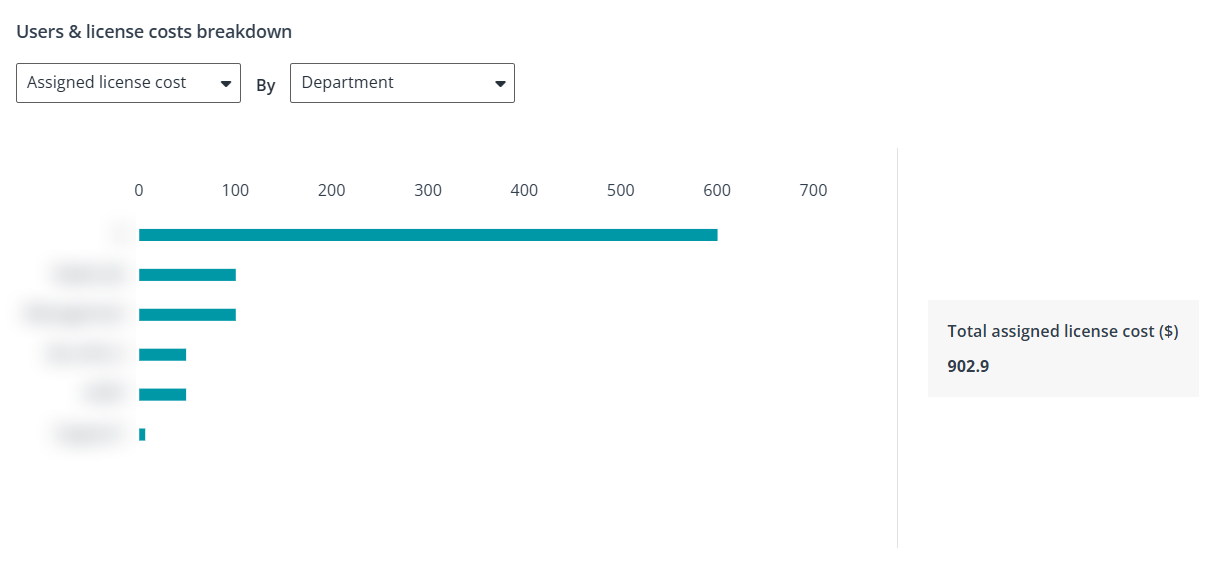
This chart shows how license cost and user accounts are broken down by a selected user property, helping you quickly understand the cost distribution patterns in your tenants.
In the dropdown lists above the chart, select whether you want to view Assigned license cost or User count first. Then, select the user property used for the breakdown. The chart updates based on your selections.
When you select a bar in the chart, the Users table below is automatically filtered based on the selected user property.
Access AI and Microsoft Service Adoption Data
If you have an AvePoint tyGraph subscription, the AI license overview section and service adoption charts in user activity panel is displayed by default. You can control the display of related data in Settings > General. For more details on AvePoint tyGraph, contact your sales representative.
In the Users tab, the AI license overview section displays AI related license assignment and adoption data in the following cards:
-
Copilot license report – Displays how Copilot license costs and Copilot users are distributed by a selected user property.
In the dropdown lists above the chart, select whether you want to view Assigned license cost or User count. Then, select the user property used for the breakdown. The chart updates based on your selections.
Clicking any value in the chart filters the Users table below this section to show only users that match the selected property value.
-
Total Copilot licenses – Displays the total number of Copilot-related licenses in your tenant.
-
Assigned Copilot licenses – Displays the number of Copilot-related licenses that have been assigned to your users.
By clicking the number, related users will be filtered and displayed in the user table below. You can select a user and click Remove Copilot license above the table to remove the Copilot license from the user.
-
Available Copilot licenses – Displays the number of Copilot-related licenses that are currently available for assignment.
-
Copilot for Sales licenses – Displays the number of Copilot for Sales licenses in your tenants.
-
Total Teams Premium licenses – Displays the number of Teams Premium licenses in your tenants.
-
Available Teams Premium licenses – Displays the number of Teams Premium licenses that are currently available for assignment.
-
High probability adopters – Displays the number of users who don't have a Copilot license but show the highest activity levels in Microsoft 365 applications like Excel, Word, OneNote, PowerPoint, Whiteboard, and Loop within the specific report period.
By clicking the number, related users will be filtered and displayed in the user table below. You can select the user and click Assign Copilot license above the table to assign Copilot license to these high probability adopters.
-
Users that only summarized meetings – Displays the number of licensed users who have obtained their license over 30 days ago and within the last 30 days, the only interaction they have initiated with Microsoft 365 Copilot are meeting summarization prompts.
By clicking the number, related users will be filtered and displayed in the user table below. You can then:
-
Remove Copilot license – Select a user and click Remove Copilot license above the table to remove the Copilot license from the user.
-
Switch to Teams Premium license – Select a user and click Switch to Teams Premium license above the table to remove the Copilot license from the user and assign a Teams Premium license to the same user.
-
-
Non-users – Displays the number of users that have not used Copilot at all.
By clicking the number, related users will be filtered and displayed in the user table below. You can then:
-
Remove Copilot license – Select a user and click Remove Copilot license above the table to remove the Copilot license from the user.
-
Switch to Teams Premium license – Select a user and click Switch to Teams Premium license above the table to remove the Copilot license from the user and assign a Teams Premium license to the same user.
-
-
One time users – Displays the number of licensed Copilot users who have used Copilot only once since receiving a license.
By clicking the number, related users will be filtered and displayed in the user table below. You can then:
-
Remove Copilot license – Select a user and click Remove Copilot license above the table to remove the Copilot license from the user.
-
Switch to Teams Premium license – Select a user and click Switch to Teams Premium license above the table to remove the Copilot license from the user and assign a Teams Premium license to the same user.
-
For more details on Copilot and AI related adoption information, you can click the tyGraph link above the AI license overview section to access the tyGraph Copilot adoption reports.
Apart from the overview adoption data of your tenant, you can also check the Microsoft 365 service adoptions and Copilot applications of individual users by following the steps below:
-
In the Users tab, select a user with related license and click View active date.
NOTEFor detailed requirements for retrieving user activities, refer to the View User Activity section below.
-
In the User activity panel, the following radar charts are displayed:
-
Microsoft 365 service adoptions – Displays the numbers of Exchange, Teams, OneDrive, and SharePoint adoptions respectively. By hovering your mouse over each service, you can see the detailed adoption number of that service.
-
Copilot application interactions – Displays the numbers of Copilot interactions of the user across Microsoft applications, including Copilot Studio, SharePoint, Office, and Teams.
You can manage the user’s license based on the information displayed. For more details on managing licenses, refer to Manage User Licenses.
-
View User Activity
AvePoint Cense supports viewing user active time for the following Microsoft 365 apps:
-
Teams
-
Viva Engage
-
SharePoint
-
Exchange
-
OneDrive
-
Skype for Business
-
Power BI
-
Dynamics 365
NOTEDue to API limitations, the user activity time on Dynamics services is currently not available to be retrieved.
-
Project Online
-
Copilot
You can view whether the last activity date is on the Desktop app or on the online service.
You can check a user's active date in Microsoft 365 apps using the following methods:
-
Enable the Activities columns. The last activity date of a service will be displayed in the corresponding enabled column in the table.
-
Select a user and click View active date on the ribbon.
-
Hover your mouse over a user, click the more actions button (…), and click View active date.
If a user lacks activity in supported services, relevant licenses, or if the licenses do not include supported services, the View active date button will be disabled.
- To retrieve the last active time, a Microsoft Entra ID P1 or P2 license is required.
- From September 2021, user-level data in Microsoft 365 Admin Center reports is pseudonymized by default. To enable Cense to retrieve user sign-in time, deselect Display concealed user, group, and site names in all report in Microsoft 365 admin center > Settings > Org settings > Reports.
- Due to API limitations, we currently support viewing the active time of Power BI and Dynamics services for users with specific licenses. To view the supported licenses, refer to Appendix B - Supported Licenses for Viewing Power BI Activities and Appendix C - Supported Licenses for Viewing Dynamics Activities.
- To retrieve Copilot related activities, a subscription to AvePoint tyGraph is required. For more details, contact your sales representative.
Downgrade User Subscription
In the Suggestion column in the Users tab or on the View active time page, recommendations for downgrading a user’s subscription are provided based on specific criteria:
-
If a user with a Microsoft 365 E3, Microsoft 365 E5, Microsoft 365 Enterprise F3, or Office 365 F3 subscription has no used Exchange storage, a downgrade to Microsoft 365 Enterprise F1 is recommended.
-
If a user with an Office 365 E3, Office 365 E5, Microsoft 365 E3, or Microsoft 365 E5 subscription uses less than 2 GB of Exchange storage, a downgrade to Office 365 F3 or Microsoft 365 F3 is recommended.
-
If a user with an Office 365 E3, Office 365 E5, Microsoft 365 E3, or Microsoft 365 E5 subscription uses between 2 GB and 50 GB of Exchange storage, a downgrade to Office 365 E1 is recommended.
To view downgrade suggestions, deselect Display concealed user, group, and site names in all report in Microsoft 365 admin center > Settings > Org settings > Reports.
To downgrade a user’s subscription, follow the steps below:
-
Click Downgrade on the View active time page. The Downgrade page will appear.
-
Select the subscription to downgrade to.
-
Click Downgrade to apply the change.
Manage User Licenses
To manage the licenses assignment of a user, select the user in the table and then click Manage licenses. Or hover your mouse over a user, click the more actions button (…), and click Manage licenses.
For detailed steps on managing user licenses, refer to Manage User Licenses.