Home > Agents > Microsoft 365 Agents
この記事をダウンロードMicrosoft 365 Agents
Microsoft 365 agents in EnPower provides centralized visibility and governance for agents that are built into or integrated with the Microsoft 365 ecosystem. This module helps administrators inventory, monitor, and analyze agent usage and activities across Microsoft 365, supporting clearer oversight, reporting, and filtering within a single management experience.
Agents of the following types are categorized and displayed in this module:
- Microsoft 365
- Copilot Studio Lite
- ISV Store
- Microsoft Store
- Organizational
- Notebook
- Copilot Fabric
- Microsoft 365 Toolkit
Click Agents in the left navigation and click Microsoft 365. Then, refer to the following sections for detailed instructions.
View Agent Details
To view the details of an agent, click the agent's display name. You will be navigated to the Agent details page where information are displayed in the following two tabs:
-
Basics – Displays basic information of the agent, including name, ID, type, status, etc.
-
Activities – Displays the agent activities of the agent by the following cards and charts:
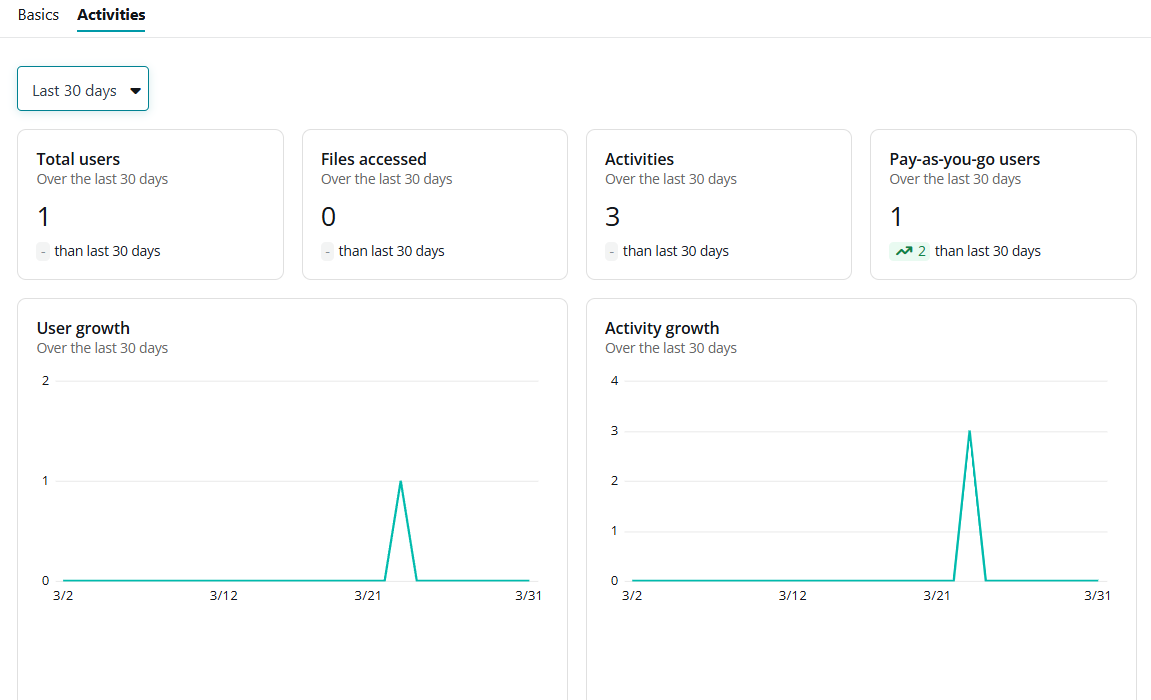
You can use the time range filter at the top to filter time range for data displayed in this tab.
-
Total users – Displays the number of users who interacted with this agent in the selected period.
-
File accessed – Displays the number of files accessed by this agent in the selected period.
-
Activities – Displays the number of agent activities in the selected period.
-
Pay-as-you-go users – Displays the number of pay-as-you-go users in the selected period.
Pay-as-you-go users are those who can use an AI agent without a dedicated Copilot license, with costs charged based on actual usage instead of a fixed subscription.
-
User growth – Displays the changes of users who interacted with the agent in the selected period.
-
Activity growth – Displays the changes of activities in the selected period.
-
Export Microsoft 365 Agents
To export Microsoft 365 agents into Excel files for further processing, complete the following steps:
-
Click Management above the table and then click Export or select target agents and then click Export selected objects.
-
Then, select fields to include in the exported report. You can select from Current fields and All fields.
-
If you select Current fields, only columns and objects shown in the table on the page will be exported. To configure the fields to show, you can manage the columns and configure the filters.
-
If you select All fields, the process will start to export the report showing all columns.
-
-
Click process center in the popup window or click View all in the Process center window to navigate to the Process center.
-
On the Process center page, you can view the export status and click the Download button to download the exported file. For more details on the Process center, refer to Process Center.
Block or Unblock Microsoft 365 Agents
Under certain circumstances (e.g., agent modification requirements), a Microsoft 365 agent can be blocked to temporarily stop users in your organization from installing or using it. Once an agent is blocked, it will also be removed from users who have already installed it.
To block Microsoft 365 agents, complete the following steps:
-
Select one or more agents to block and click Management > Block.
-
In the confirmation window, click Block agent. The agents will be blocked upon clicking.
To unblock agents when needed, complete the following steps:
-
Select one or more blocked agents and click Management > Unblock.
-
In the confirmation window, click Unblock agent. The agents will be unblocked and become available for users in your organization for installation and usage.
Alternatively, you can block or unblock an agent on the Agent details page by following the steps below:
-
Click the name of an agent to go to the Agent details page.
-
In the Basics tab, click the Edit icon in the Blocked field that shows the agent's blocking status.
-
In the confirmation window, click Block agent or Unblock agent.
Delete Microsoft 365 Agents
To delete Microsoft 365 agents from your organization, complete the following steps:
-
Select one or more agents to delete and click Management > Delete.
-
In the confirmation window, click Delete. The agents will be deleted. This will completely delete the agents from your organization and cannot be reversed.
Cloud Governance Integrated Management
EnPower integrates with Cloud Governance to provide lifecycle management for your agents. With a Cloud Governance subscription, you can edit the applied Cloud Governance metadata, manage contacts, perform renewals, and configure Cloud Governance registration.
Some lifecycle management tasks can be performed only after the agent is imported into Cloud Governance. To import agents by using EnPower, you must apply renewal profiles to them or modify their metadata. For details, refer to Edit Cloud Governance Metadata and Renew Agents.
Edit Cloud Governance Metadata
If you have a Cloud Governance for Microsoft 365 subscription, you can manage the Cloud Governance metadata applied to the Microsoft 365 agents in EnPower. To add, remove, or edit the values of metadata of a agents, complete the following steps:
-
Select an agent and click Governance on the ribbon. Then, select Edit metadata from the drop-down list.
-
In the Edit metadata panel, all existing Cloud Governance metadata applied to the agent are listed. You can:
-
Click Add metadata to apply new metadata to the agent. In the Add metadata panel, select the metadata to add and click Add in the lower-right corner.
-
Click Remove to remove certain metadata from the agent.
-
Edit the metadata values.
-
-
Click Save.
To edit metadata of multiple agents at a time, complete the following steps:
-
Select multiple agents and click Governance on the ribbon. Then, select Edit metadata from the drop-down list.
NOTEYou can only bulk edit metadata for agents in the same tenant.
-
In the Edit metadata panel, select the bulk operation:
-
Add metadata – Select to apply new metadata to the agents. Then, select the metadata to add and enter their values.
-
Remove metadata – Select to remove certain metadata from the agents. Then, select the metadata to remove.
-
Remove metadata and add new ones – Select to remove all existing metadata from the agents and add new ones. Then, select the metadata to add and enter their values.
-
Update metadata with new values – Select this option to update the values of specific metadata applied to the agents. Then select the metadata and enter the new values. If the specified metadata to be updated is not applied to the agents, the action is skipped. Only agents with the specified metadata can be updated.
-
-
Click Save.
Manage Contacts
The contact assignment and election actions help ensure that each Microsoft 365 agent has clear ownership and accountability by defining who is responsible for governance and communication. These actions support consistent contact management across agents and keep lifecycle processes coordinated, even when agents are in different governance or renewal states.
Specify Contacts
To specify the primary and secondary contacts of your agents in EnPower to allow specific users to manage the agents, complete the following steps:
-
Select the agents to specify contacts for.
-
Click Governance on the ribbon. Then, select Contacts > Specify contacts from the drop-down list.
-
In the Specify contacts panel, configure the following settings:
-
Primary contact – Enter the name of a user to be the primary contact.
Select whether to Notify the contact when the Microsoft 365 agent is assigned. If selected, you need to select an email template for the notification email from the dropdown list.
-
Secondary contact – Enter the name of a user to be the secondary contact.
Select whether to Notify the contact when the Microsoft 365 agent is assigned. If selected, you need to select an email template for the notification email from the dropdown list.
-
-
Click Save. The process will start to assign the agent to the contacts.
Apply Contact Election Profile
To apply a contact election profile to agents, complete the following steps:
-
Select one or more agents and click Governance on the ribbon. Then, select Contacts > Apply contact election profile from the drop-down list.
-
In the Apply contact election profile panel, complete the following configurations:
-
Contact election profile – Select a contact election profile to apply. For details on creating contact election profiles in Cloud Governance, refer to Configure AI Agent Contact Election Profiles.
-
How do you want to handle Microsoft 365 agents that have ongoing contact election tasks – When you are applying profile to agents in the Preparing renewal report, Renewal completed with exception, Renewal in progress, Renewal overdue, or Renewal pending phases, select one of the following options:
-
Do not apply the new profile to these Microsoft 365 agents
-
Cancel all ongoing contact election tasks, escalation tasks, and apply the new profile
-
-
-
Click Save. The process will start to apply the contact election profile.
Trigger Contact Election Task
To trigger the contact election task of agents, complete the following steps:
-
Select one or more agents and click Governance on the ribbon. Then, select Contacts > Trigger contact election task from the drop-down list.
-
In the confirmation window, click Trigger. The process will start to trigger the contact election task.
Renew Agents
Agent renewal allows users to periodically review and update agent contacts, permissions, and metadata in a single task. In EnPower, you can apply renewal profiles created in AvePoint Cloud Governance to your agents, restart the renewal process, and reassign renewal tasks. Refer to the following sections for more details.
Apply Renewal Profile
To apply renewal profile to agents, complete the following steps:
-
Select the agents to apply the renewal profile to. For details on creating renewal profiles in Cloud Governance, refer to Configure AI Agent Renewal Profiles.
-
Click Governance on the ribbon. Then, select Renewal > Apply renewal profile from the drop-down list.
-
In the Apply renewal profile panel, select the renewal profile to apply.
-
If there are agents already in the renewal process, select how you want to handle the agents from one of the following actions:
-
Do not apply the new profile to these Microsoft 365 agents – Select this option to skip all agents that have ongoing tasks.
-
Cancel ongoing renewal tasks, escalation tasks, and apply the new profile – Select this option to cancel all the ongoing tasks before the new profile is applied. If selected, you can also select a checkbox to Send a cancellation email to the task assignees and select the email template to use.
-
-
Click Save to update the changes.
Assign Renewal Tasks
In addition to the existing renewal task assignees, you can specify another user to assign the renewal task to and make that user the new task assignee. To assign renewal tasks, complete the following steps:
-
Select the agents whose renewal tasks are to be assigned.
-
Click Governance on the ribbon. Then, select Renewal > Assign renewal tasks from the drop-down list.
-
In the Assign renewal tasks panel, specify the user to add as the assignee.
-
Click Save. The process will start to reassign the task.
Restart Renewal
To restart the renewal process of agents, complete the following steps:
-
Select the agents to restart the renewal process.
-
Click Governance on the ribbon. Then, select Renewal > Restart renewal from the drop-down list.
-
In the confirmation window, select whether to Send a cancellation email to the task assignees. If to send, select the email template to use.
-
Click Apply. The process will start to restart the renewal process for the selected agents.
Remove Agents from Cloud Governance
To remove registered agents from AvePoint Cloud Governance, complete the following steps:
-
Select one or more agents to remove. The selected agents must have been registered in Cloud Governance. You can find them with the Registered filter under Governance details category.
-
Click Governance on the ribbon. Then, select Remove from Cloud Governance from the drop-down list.
-
In the confirmation window, select I agree that everything related to the selected agents will be removed from AvePoint Cloud Governance. Then, click Remove. The process will start to remove the selected agents from Cloud Governance.