
Home > Data Export Service
Download this articleData Export Service
If the subscription to AvePoint Cloud Backup for Salesforce® service ends, AvePoint will retain the backup data in AvePoint storage for 15 days, subject to the terms of your service agreement. The backup data in AvePoint storage can be exported to your own storage as a paid service. You must submit an export request if you wish to export your data from AvePoint Storage.
The standalone tool is not supported for BYOS customers and GCP customers.
Backup data is encrypted and stored in AvePoint format rather than as pure copies of Salesforce data. AvePoint offers a standalone export tool to export backup data to your own storage or a local location, and convert encrypted backup data into a readable format. For details, refer to Export Backup Data via This Tool.
Get Started
Before data recovery, you must verify the following:
-
Follow the instructions in Export Encryption Key for AvePoint Cloud Backup for Salesforce® to get the encryption keys ready.
-
Submit an export request to export your data from AvePoint Storage.
-
Obtain a stand-alone tool package: AvePoint Cloud Backup for Salesforce® Standalone Tool.zip.
Export Encryption Key for AvePoint Cloud Backup for Salesforce®
Backup data generated by AvePoint Cloud Backup for Salesforce® is encrypted. You need an encryption key to help you convert the backup data to a plain file format during the export. Your tenant administrator in the AvePoint Online Services platform can export the encryption key from the AvePoint Cloud Backup for Salesforce® interface directly.
To export the encryption key, complete the steps below:
-
Go to the AvePoint Cloud Backup for Salesforce® interface.
-
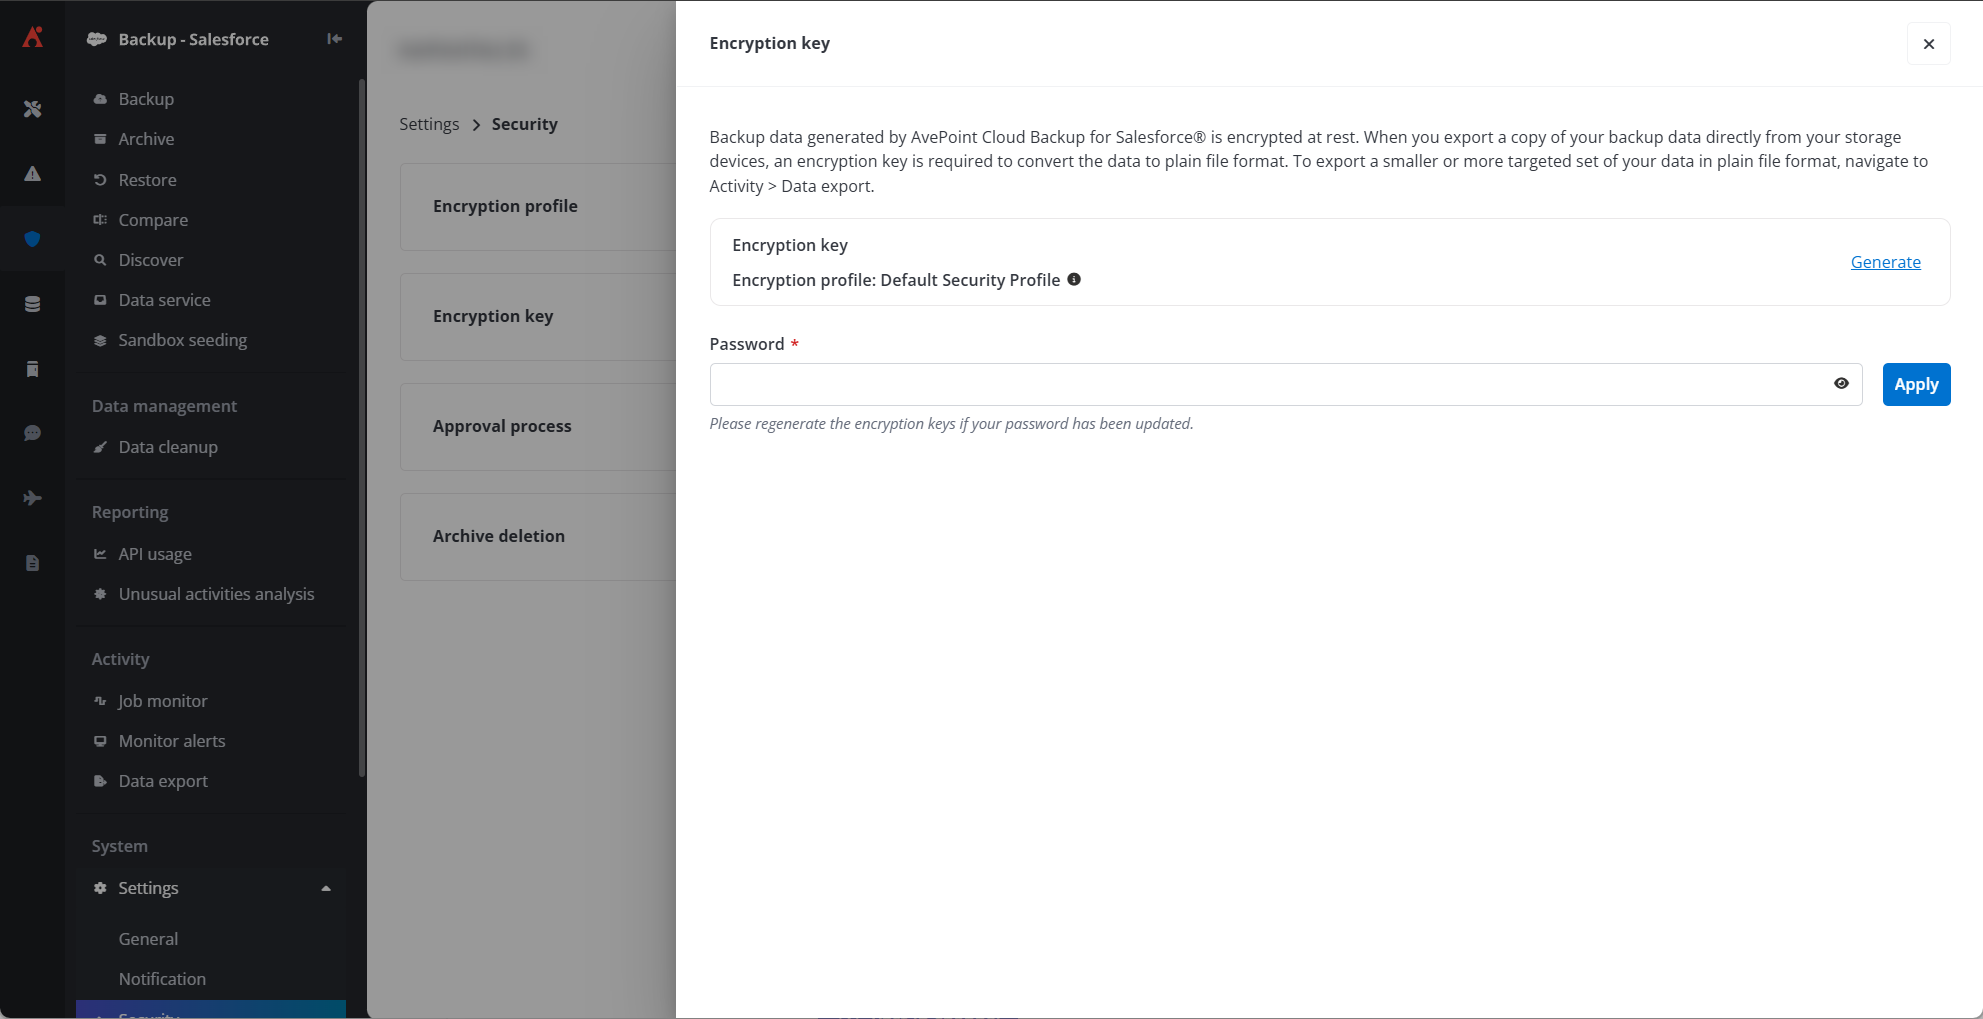
Navigate to Settings > Security > Encryption key.
NOTETo export the encryption key, please contact AvePoint support to enable the Encryption key feature.
-
Set a password for encryption keys and click the Apply button to apply the password. The password is used to access the encryption keys in the standalone tool.
-
To generate and download the encryption key, click the Generate button to generate the key, and then click Download to download the ZIP file and save it to your local computer.
If you have performed backups or updated the password after the last time you generated the key, click Regenerate to regenerate the keys and download the file again.
Export Backup Data via This Tool
Follow the instructions below to export the backup data of Salesforce® using AvePoint Cloud Backup for Salesforce® Standalone Tool.
-
Extract the package and find the StandaloneTool.exe file.
-
Double-click the StandaloneTool.exe application file. The AvePoint Cloud Backup for Salesforce Standalone Tool window appears.
-
In the Backup Data Location step, select the storage type and configure the storage information. So far, this tool has supported the following storage types.
Microsoft Azure Blob Storage:
-
Access Point - Enter the URL for the Blob Storage Service. The default URL is
https://blob.core.windows.net. -
Container Name - Enter the container name you wish to access.
-
Account Name - Enter the corresponding account name to access the specified container.
-
Account Key - Enter the corresponding account key to access the specified container.
-
Extended Parameters – Enter the following extended parameters if necessary. If you have multiple parameters to enter, press Enter on your keyboard to separate the parameters. Refer to the instructions below to add parameters.
-
RetryInterval – Customize the retry interval when the network connection is interrupted. You are allowed to enter any positive integer between 0 and 2147483646 (the unit is millisecond). For example, RetryInterval=30000 means that it will try to reconnect every 30000 milliseconds.
If you do not configure this parameter, the value is 30000 milliseconds by default.
-
RetryCount – Customize the reconnection times after the network connection is interrupted. You are allowed to enter any positive integer between 0 and 9. For example, RetryCount=9 represents when the network connection is interrupted. It can reconnect at most 9 times.
If you do not configure this parameter, the value is 6 by default.
-
CustomizedMetadata – Configure if customized metadata or user-added metadata is supported. By default, customized metadata and user-added metadata are all supported.
-
CustomizedMode=Close – This physical device will not support customized metadata or user-added metadata.
-
CustomizedMode=SupportAll – This physical device will support all customized metadata and user-added metadata.
-
CustomizedMode=CustomizedOnly – This physical device will only support user-added metadata.
-
SFTP:
-
Host – Enter the IP address of the SFTP server.
-
Port – Enter the port to use to connect to this SFTP server. The default port is 22.
-
Root Folder – Enter the root folder that you wish to access.
-
Username – Enter the username used to access the root folder.
-
Authentication Method – Select the Password or Public Key as the authentication method.
-
Password – Enter the corresponding password of the user used to access the root folder.
-
Public Key – Enter the private key and the corresponding private key password to access the root folder.
-
-
Extended Parameters – You can also enter the following extended parameters if necessary. If you have multiple parameters to enter, press Enter on the keyboard to separate the parameters. Refer to the instructions below to add parameters:
-
IsRetry – Whether or not to try again when Cloud Backup fails to write the data in the physical device.
-
If you enter IsRetry=true, it will try again when Cloud Backup fails to write the data in the physical device.
-
If you enter IsRetry=false, it will not try again when Cloud Backup fails to write the data in the physical device.
-
-
RetryInterval – Customize the retry interval when the network connection is interrupted. You are allowed to enter any positive integer between 0 and 2147483646 (the unit is second). For example, RetryInterval=30 means that it will try to reconnect every 30 seconds.
If you do not configure this parameter, the value is 30 seconds by default.
-
RetryCount – Customize the reconnection times after the network connection is interrupted. You are allowed to enter any positive integer between 0 and 9. For example, RetryCount=9 represents when the network connection is interrupted. It can reconnect at most 9 times.
If you do not configure this parameter, the value is 6 by default.
-
Amazon S3:
-
Bucket Name – Enter the bucket name you wish to access.
-
Access Key ID – Enter the corresponding access key ID to access the specified bucket. You can view the Access key ID from your AWS account.
-
Secret Access Key – Enter the corresponding secret key ID to access the specified bucket. You can view the Secret access key from your AWS account.
-
Storage Region – Select the storage region of this bucket from the drop-down menu.
-
Extended Parameters – Enter the following extended parameters if necessary. If you have multiple parameters to enter, press Enter on your keyboard to separate the parameters. Refer to the instructions below to add parameters.
-
RetryInterval – Customize the retry interval when the network connection is interrupted. Enter any positive integer between 0 and 2147483646 (the unit is millisecond). For example, RetryInterval=30000 means that it will try to reconnect every 30000 milliseconds.
If you do not configure this parameter, the value is 30000 milliseconds by default.
-
RetryCount – Customize the reconnection times after the network connection is interrupted. Enter any positive integer between 0 and 9. For example, RetryCount=9 represents when the network connection is interrupted, and it can reconnect at most 9 times.
If you do not configure this parameter, the value is 6 by default.
-
CustomizedMetadata – Configure if customized metadata or user-added metadata is supported. By default, customized metadata and user-added metadata are all supported.
-
CustomizedMode=Close – This physical device will not support customized metadata or user-added metadata.
-
CustomizedMode=SupportAll – This physical device will support all customized metadata and user-added metadata.
-
CustomizedMode=CustomizedOnly – This physical device will only support user-added metadata.
-
CustomizedRegion – Configure the customized region of the physical device. For example, enter CustomizedRegion=s3.us-gov-west-1.amazonaws.com to configure the GovCloud account.
-
Amazon S3-Compatible:
-
Bucket name – Enter the bucket name you wish to access.
-
Access key ID – Enter the corresponding access key ID to access the specified bucket.
-
Secret access key – Enter the corresponding secret key ID to access the specified bucket.
-
Endpoint – Specify the URL for the location where the data is to be stored.
NOTEThe URL must begin with “http://” or “https://”.
-
Extended Parameters – Enter the following extended parameters if necessary. If you have multiple parameters to enter, press Enter on your keyboard to separate the parameters. Refer to the instructions below to add parameters.
-
Allow_Insecure_SSL – By default, the storage client expects an SSL certificate issued by a public trusted certificate authority over HTTPS transport to ensure integrity. A self-signed certificate on the storage server side will fail the certificate validation. If you choose to use a self-signed certificate, you can set the Allow_Insecure_SSL to true in the Extended parameters to bypass the certificate validation.
-
SignatureVersion – By default, Cloud Backup uses V4 authentication to access your storage. If you want to use V2 authentication, add SignatureVersion=V2 into the extended parameters.
-
RetryInterval – Customize the retry interval when the network connection is interrupted. Enter any positive integer between 0 and 2147483646 (the unit is millisecond). For example, RetryInterval=30000 means that it will try to reconnect every 30000 milliseconds.
If you do not configure this parameter, the value is 30000 milliseconds by default.
-
RetryCount – Customize the reconnection times after the network connection is interrupted. Enter any positive integer between 0 and 9. For example, RetryCount=9 represents when the network connection is interrupted. It can reconnect at most 9 times.
If you do not configure this parameter, the value is 6 by default.
-
CustomizedMetadata – Configure if customized metadata or user-added metadata is supported. By default, customized metadata and user-added metadata are all supported.
-
CustomizedMode=Close – This physical device will not support customized metadata or user-added metadata.
-
CustomizedMode=SupportAll – This physical device will support all customized metadata and user-added metadata.
-
CustomizedMode=CustomizedOnly – This physical device will only support user-added metadata.
-
Cert_thumbprint – If you have a self-signed certificate for S3 server and only want to pass the certificate validation with a specific thumbprint, enter your thumbprint as the value of the parameter.
-
Virtualhosting – By default, it is set to false. If your bucket does not support using path-style domain names, you need to configure virtualhosting = true to use virtual-hosted-style domain names.
-
-
-
Click Next.
-
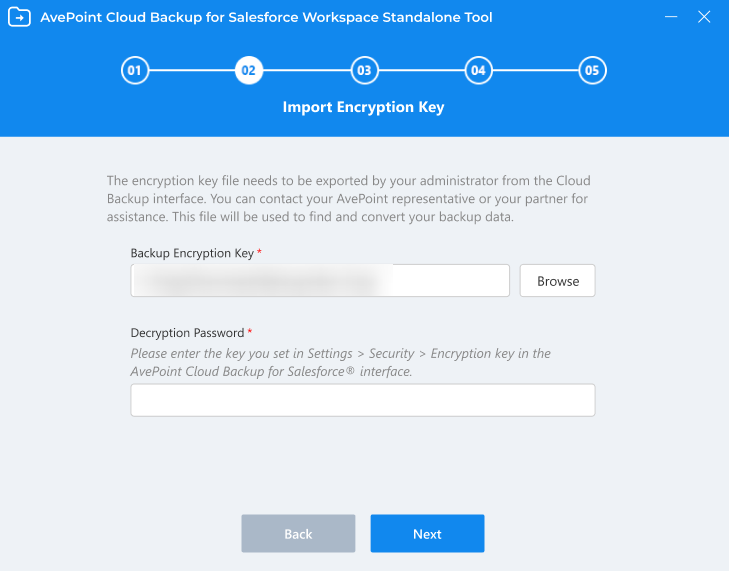
In the Import Encryption Key step, click Browse to browse and select the ZIP file of the encryption keys, and enter the password you set in AvePoint Cloud Backup for Salesforce® to access the encryption keys. This export tool will find the backup data from your storage and convert it to plain file format.
-
Click Next.
-
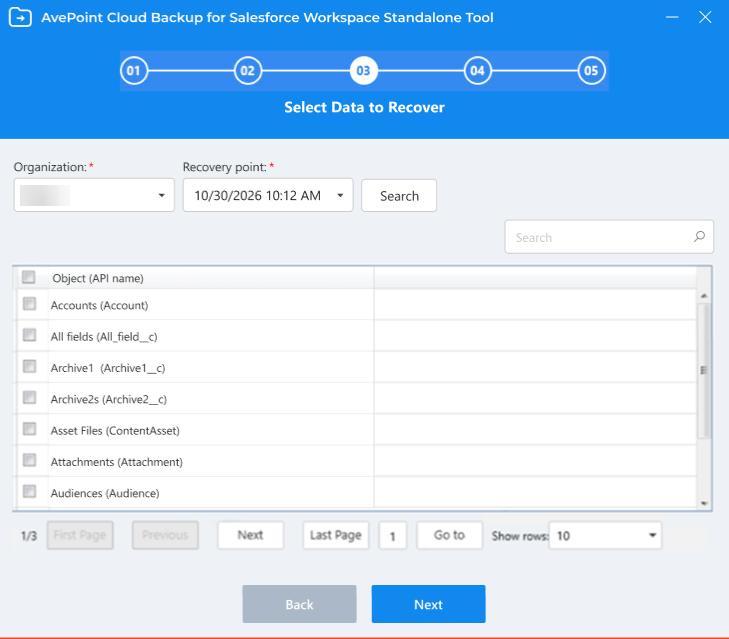
In the Select Data to Recover step, select an Organization and Recovery point and click Search to filter the required objects.
Then select the objects you want to export. You can select specific objects or select all objects by checking the box in the header row.
-
Click Next.
-
In the Select Export Location step, select the location:
-
Local location – Click Browse to select a disk or folder to store the exported data.
-
Original BYOS location – Select this option to export the data to your original BYOS location.
-
-
Click Next to start the export job.